
Note: this post refers to self-hosted WordPress. If you need help with a WordPress.com site, that’s a different animal. If you don’t know the difference, email me and I’ll help you understand!
WordPress is not only the most popular website-creating platform, it’s also the internet’s biggest ecommerce platform. It’s also fairly easy to get started using. But what happens when something goes awry? With a self-hosted WordPress site, you can’t call tech support. Sure, you can Google it, and there’s a great team of volunteers who work the support forums. But sometimes it can take hours or days to get an answer. That’s why you need to be able to troubleshoot WordPress on your own.
In this troubleshooting post, I’m going to show you how to disable all your plugins to diagnose problems. It’s a good first step before posting in a support forum or contacting your web host to resolve issues.
Why disable WordPress plugins?
You might be wondering, “But how do I know my problem is due to a plugin?” Well, you don’t. And neither do I. But almost any time I’m having an issue in WordPress, that’s where I start. Plugins can cause conflicts with your theme or other plugins, which can mess things up or even shut you out of your site. Even if you haven’t installed any new plugins, a single plugin update can cause problems. So before you hunker down for hours of Googling, start here.
There are two ways to disable your plugins: Through the dashboard and through your web host. Let’s start with the dashboard.
Disable plugins in the dashboard
If you can still access your Admin dashboard, you’re already in pretty good shape — despite the issue you’re seeing. So, take a relaxing breath. Now, before you skip ahead and start deactivating plugins willy-nilly, there are some things you need to know.
First, deactivating one plugin at a time may not tell you where the problem is. You have to deactivate all of them at once, then reactivate one at a time until you can reproduce the issue you’re seeing.
You might be thinking, Hold up. If I deactivate my plugins, my site will be all kinds of messed up. I’ll lose readers, business, etc.! And you would be right. So here’s how you do it without messing up your site.
Step 1: Install Health Check & Troubleshooting
One of the plugins I always recommend for all WordPress sites is Health Check & Troubleshooting. It was developed and is maintained by the WordPress community, so you can trust it. Running in the background, it performs checks on your WP installation and can detect common configuration errors, plus checks your server for issues.
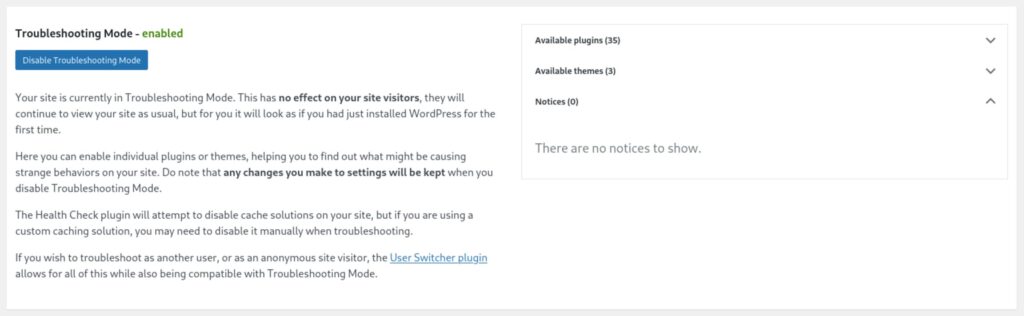
The coolest feature is Troubleshoot Mode. When enabled, it deactivates all your WordPress plugins but only for you. Your visitors still see your usual content and layout, completely intact. Isn’t that awesome?
Step 2: Enable Troubleshoot Mode
Download the plugin from the link above, or search for it in Plugins→Add New. Once installed and activated, you’re ready to go. To enable it, navigate to Tools→Site Health→Troubleshooting. Click the Enable Troubleshooting Mode button.
Step 3: Reactivate Plugins
You’ll see that your plugins are all deactivated (not deleted). The best way to troubleshoot potential plugin conflicts is to reactivate them one by one and see if you can reproduce the issue you’re having. When you do that, you’ve found the culprit!
What if none of the plugins causes an issue? Well, at least you’ve ruled that out as a cause. And I’m saving you a lot of time here, because even if it’s not a plugin, if you go looking in a forum for support, someone will likely tell you to do what I just did. So when you post a topic, list deactivating all plugins as a step you’ve tried.
And what if you can’t access your WordPress admin? I’m glad you asked.
Disable plugins through your web host
Okay, you can’t get into your dashboard. Now what? You’re going to have to access your site’s files via FTP or at your account dashboard at your web host. It’s not as hard as it sounds.
Access through your web host
This is usually the easiest route. Every reputable web host gives you easy access to your files through their dashboard, control panel, or whatever they call it. I’ll use DreamHost as my example — which I highly recommend, by the way.
Your hosting account and access will likely vary from mine. But your host definitely has specific instructions on how to do this.
In my hosting account, I find the website I want to access, and click Manage Files.
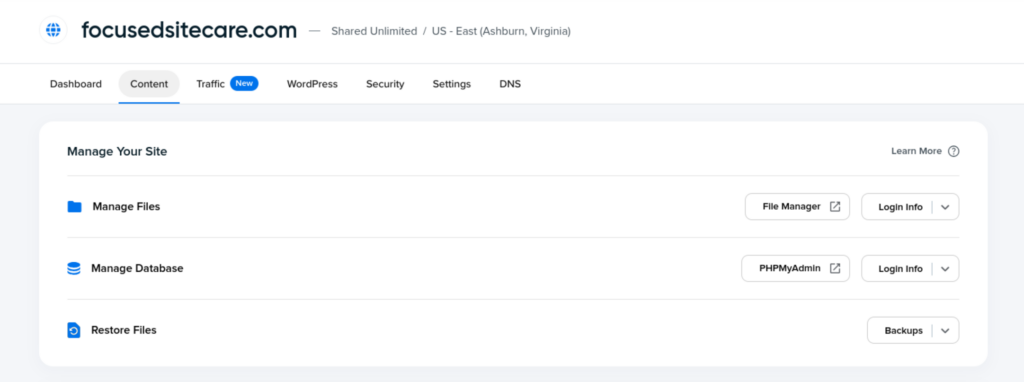
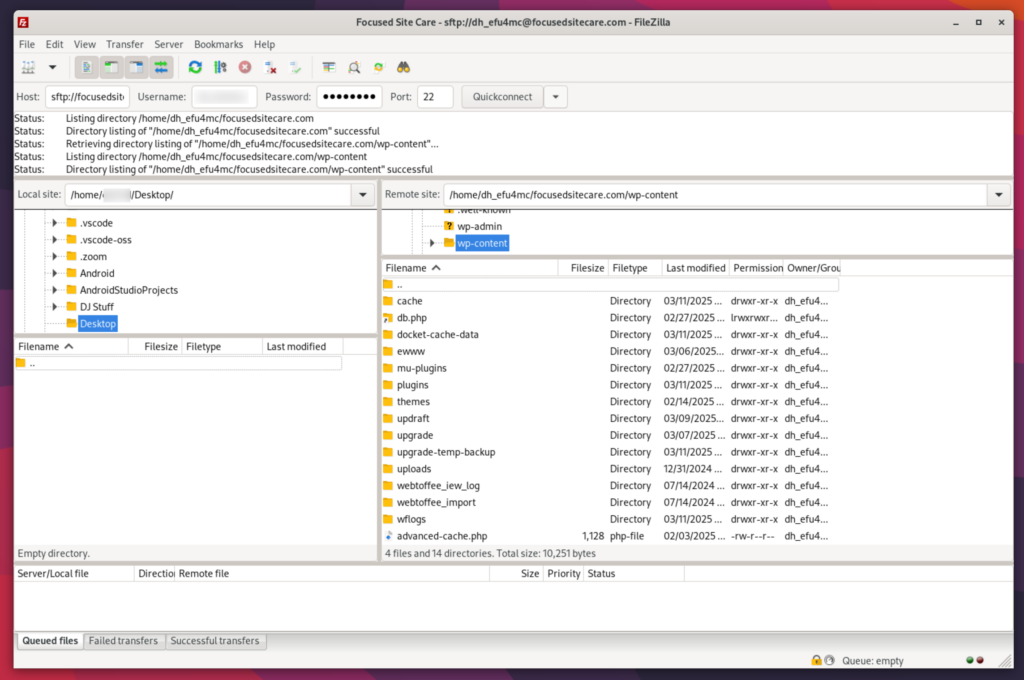
Now I have direct access to all the files for my website. I can search, edit, delete, and upload — similar to a cloud account like iCloud or OneDrive.
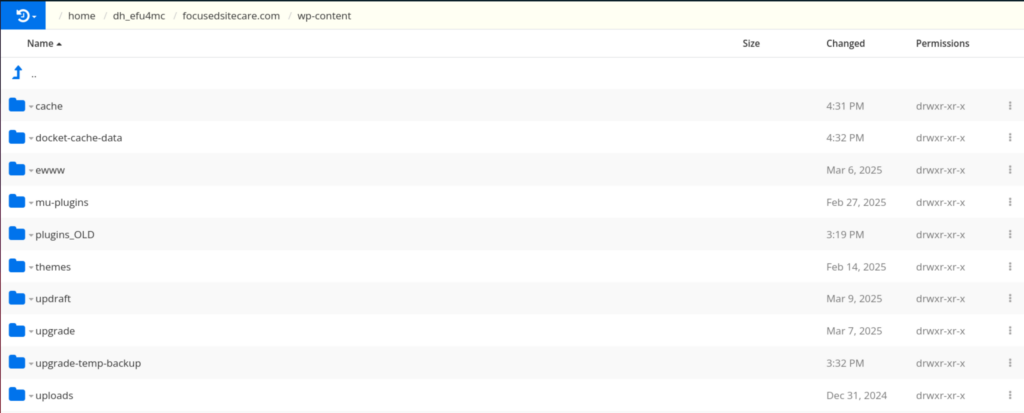
Your plugins are stored in the same place as any other WordPress installation: wp-content/plugins. In fact, if you look in that folder/directory, you’ll see directories named for all the plugins you have installed.
But first, let’s see if we can get you back into your WordPress admin by disabling them all at once.
First, rename your plugins folder to plugins_OLD. This effectively deactivates them, because WordPress suddenly doesn’t know where to find them.
Now, try to log into your WordPress admin again. If you’re in, yay! But now you’ve only determined that a plugin is the problem. You still have to diagnose which plugin it is.
While still logged into your admin, go back to your host and rename plugins_OLD to plugins. Now you can follow the instructions for troubleshooting form within the dashboard.
If you still can’t get in, then plugins aren’t causing the problem. Go ahead and rename your plugins folder to plugins anyway. If you need further help, contact me and I’ll see what I can do.
Access through FTP
If your web host doesn’t offer a file management system* or you just like doing it a different way, you can access your server via FTP.
*You need a new host, btw
First, you’ll need what’s called an FTP client. It’s an app that helps you get access to a server. There are a lot of good free ones out there, but my two favorites are CyberDuck and FileZilla. I’ll use FileZilla as an example.
You’ll need to have some login credentials ready, and for that you’ll need to contact your web host. Ask them what you need to access your server via FTP. Specifically, you’ll need:
- Protocol: SFTP (this is secure FTP)
- Host: sftp://yoursite.com ← replace with the name of your site!
- Port: 22 (usually)
- User: The FTP user name your host gave you
- Password: Your FTP password
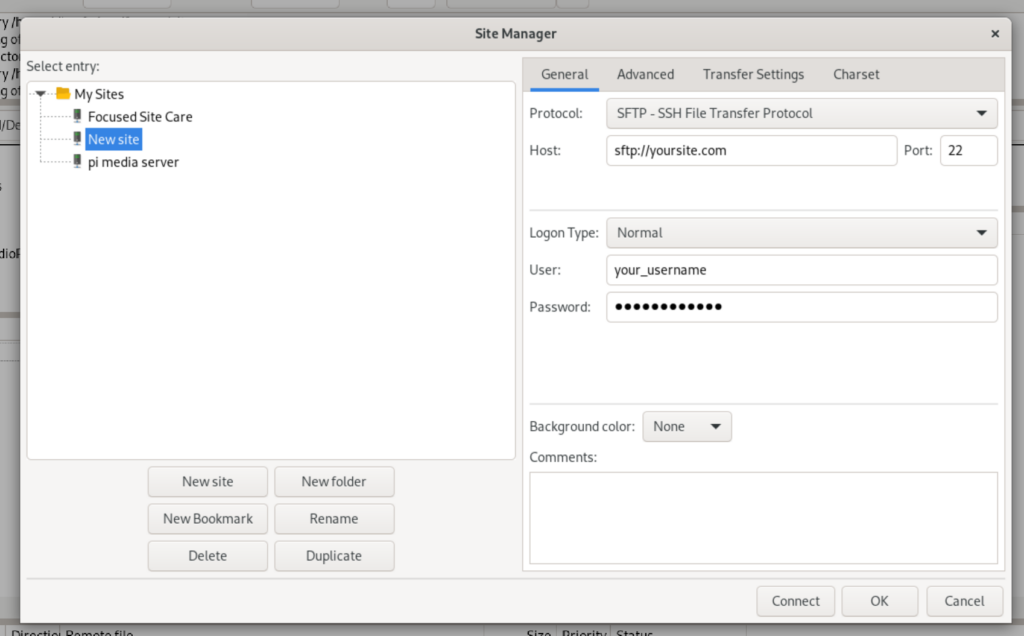
Click Connect, and you should see the files on your server.
Now you can follow the directions I gave earlier to disable your plugins.
Disabling Plugins is only the first step
Now you have a new skill! While this can be an effective way to solve a lot of issues in WordPress, it’s really just the first step. You’ve either ruled out a plugin as a source, or you’ve discovered that a plugin is causing your problems. The next steps are:
- Find out which plugin is the problem and contact the developer -OR-
- Track down the real culprit.
If you still need to find that culprit, I highly recommend searching or posting in the WordPress Community forum. Or, you can contact me and I’ll help point you in the right direction. But you know I’m going to ask you if you disabled your plugins first. 😜
Photo by Christian Buehner on Unsplash
Leave a Reply